A garage door opener is not the thing that lifts your door. The springs do that. The opener just steers the door along the track and holds it there while it moves. That one misunderstanding is behind most of the five-year openers I pull out of Tulsa garages and replace with the same model that should have run for fifteen.
I have been swapping openers for neighbors and clients for twelve years, and there is a drawer in my shop full of dead parts, each one labeled with the date it failed. Stripped nylon gears. Rails bent because somebody mounted the header bracket an inch off center. Chains that stretched through a cold snap. Photo-eyes aimed straight into the afternoon sun. Every one of those failures was predictable the day it was installed.
You can dodge nearly all of it. The opener matters less than the door balance and the quality of the install, but you still want a unit with a straight rail and a motor that was not built to a price point. This guide walks through the order of operations for a chain drive garage door opener install that actually lasts, plus the two Genie models I send most budget-minded people to look at when they are shopping chain drive.
Why you should trust me
I am not a reviewer who unboxes a product on a kitchen table. I am the guy in the attic at 7 a.m. with a level in one hand and a socket in the other. Twelve years, more than 200 openers installed or replaced, and a repair list that has taught me which parts fail first. The motor is almost never the failure. It is the rail, the chain, the door balance, or a sensor that got knocked out of line by a recycling bin.
I keep notes on what fails and when, and I score my own predictions every January. My track record says the drive system and the door hardware decide whether an opener reaches year ten, not the horsepower number on the box.
How I picked and how I looked at these two
I am not going to pretend I put these two units on a test bench with an instrumented dyno. What I can tell you is how I judge a chain drive opener and what I check on the listing before I recommend one to anybody.
First, the drive. A chain drive is a steel chain running along a steel rail. It is louder than a belt, it is cheaper to make, and it is dead reliable when the rail is straight and the chain tension is right. Second, the rail. A flimsy rail flexes under load and eats the chain over time. Third, what is in the box. A kit that includes remotes, a wall console, a keypad, and safety sensors saves you forty or fifty dollars of a la carte accessories later.
The numbers that matter to me: how much of the kit is included, whether the rail is a single piece or a stack of bolt-together sections, and how many moving parts sit between the motor and the trolley. Fewer is better.
Two caveats on this list before we get into it. Both of these are chain drive, and if you have a bedroom above the garage, chain noise is a real issue and you should be reading a belt drive guide instead. The other caveat is that neither of these is a commercial duty unit, and this is not a commercial door guide.
Balance the door before you buy anything
Do this first, because it changes what you need to buy. Pull the emergency release cord so the opener is disconnected from the door, then lift the door by hand to about waist height and let go.
A balanced door stays where you put it. A door that slides down is heavy on the springs and a door that climbs on its own is over-sprung. Either way, a new opener will strain against it, and the plastic or nylon gears inside any consumer unit will lose that fight. Stripped gears in a two-year-old opener are almost always a door balance problem wearing a gear failure costume.
If the door drops, if it climbs, if a cable looks frayed, or if you see a gap in the torsion spring winding, stop and call a garage door tech. Torsion springs store enough energy to kill you, and that is not a joke or a disclaimer. That is the one part of this job that stays with a professional.
While the door is disconnected, lift it all the way up and down a few times. It should roll smooth with one hand. Grinding, binding, or a roller that skips means the track is out of alignment, and an opener will not fix it.
The two chain drive openers worth your time
These are the two Genie kits I point people toward most often for a standard residential door. One is the value play and one is the complete kit.
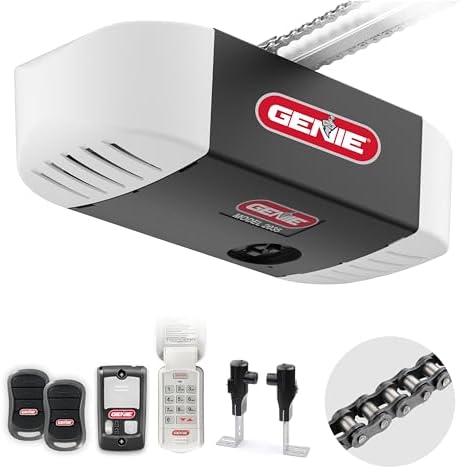
Our pick: Genie Chain Drive 550 Garage Door Opener, Heavy Duty Chain Drive Opener, Model 2035-TKO
 Visit on Amazon →
This is the one I send people toward when the door is a standard single or double, the garage is detached, or nobody sleeps above it. It is a heavy duty chain drive unit, which for a house that runs four open and close cycles a day is more than enough. Check current Amazon price.
The honest knock is noise. A chain traveling down a steel rail at 6:30 in the morning is audible through drywall, and if the master bedroom sits over the garage you will hear it. That is the trade for the price. For a detached shop or a house where the garage sits under a guest room, it is a non-issue.
Before you order, look at the listing and confirm exactly what ships in the box. Genie bundles vary by model, and if you need a keypad or a second remote, an opener that does not include them gets expensive in a hurry.
Flaws but not dealbreakers: The chain is the noise source, so plan the bedroom math. Also check what accessories are included, because kits in this class differ.
Anyone with a standard residential door on a budget who does not need a bedroom-quiet opener should start here.
Upgrade pick: Genie ChainMax 1000 Garage Door Opener, Model 3022-TKH
 Visit on Amazon →
This is the kit I recommend when somebody wants to install once and not think about accessories again. It ships with two three-button remotes that come pre-programmed, a wall console, a wireless keypad, and Safe-T-Beams safety sensors, and it runs a 140V DC motor. Check current Amazon price.
That accessory list is the reason to step up. Two cars means two remotes, and a keypad means the kids and the dog walker are not borrowing a visor remote that will cook in the Oklahoma heat. Pre-programmed remotes also save you the pairing ritual, which is where I get most of my support calls on any brand.
A DC motor is the spec I look at first on any opener in this class. It is a smoother start and stop than a comparable AC unit, which is easier on the trolley and the door hardware over thousands of cycles.
Flaws but not dealbreakers: It is still a chain, so it is still audible. It is also a heavier box with more in it, so get a second person to help hold the rail up while you mark holes. Doing this alone on a ladder is how people drop motors on their foot.
Anyone who wants the complete kit in one box, with a keypad and a spare remote included, should look here first.
The install, step by step
This is the part that decides whether you get five years or fifteen. The openers above are fine units. A bad install will kill either one.
Step one: Kill the power and disconnect the old unit. Trip the breaker, unplug the opener, and pull the emergency release. Confirm the door is balanced before you remove anything. See the section above.
Step two: Find the header. The header bracket mounts to the wall above the door, centered on the door, into solid framing. Into a stud or a bolted 2x6 backer, never into drywall anchors. If you mount it off center, the rail pulls the trolley sideways and the chain wears on one edge. This is the single most common mistake I see on DIY installs.
Step three: Check your ceiling line. The rail has to run from the header bracket straight back to the motor. Measure the height of the header bracket and figure out where the motor will hang so the rail is level or angled very slightly nose-up toward the door. Cathedral ceilings and low clearances are the two things that turn a two-hour job into a six-hour job. Get up there with a tape measure before you buy.
Step four: Assemble the rail on the floor. Build it flat and square, not on a ladder. Follow the manual for the number of rail sections and hardware. Do not overtighten the chain on a chain drive unit. A chain that is banjo tight howls and wears the sprocket. The manual will give you the deflection spec, and it will be looser than you expect.
Step five: Hang the motor. Use the angle iron and lag bolts that come with the kit, into ceiling joists. Two hangers at minimum, three if the rail is long. Keep the rail level side to side. A twist in the rail shows up as a chain that jumps the sprocket a year later.
Step six: Connect the trolley and the door arm. Bolt the arm to the door, attach the trolley, and check that the arm is not binding at either end of travel. If the door arm looks like it is pulling the door at an angle, your header bracket is off center. Go back to step two.
Step seven: Set the travel limits. This is where the door stops at the top and bottom. Run the door down and set the down limit so the door rests fully on the floor without the rail bowing and without the motor straining at the end. Then run it up and set the up limit so the door clears the opening with a little room, not a slam into the stop bolt. Travel limits that are set too tight are why openers forget their positions after a power outage.
Step eight: Set the force and test the safety reverse. Every opener has a force adjustment, and it should be set to the minimum that moves the door. Not the maximum. Maximum force turns a safety feature into a door that keeps pushing. Test it with a 2x4 laid flat on the floor in the door's path. The door should contact it and reverse. If it does not, lower the force setting and try again.
Step nine: Align the photo-eyes. Both sensors go on the track brackets, a few inches off the floor, lenses facing each other. Aim them so the indicator light is solid. The number one cause of a photo-eye that "needs realignment after every bump" is sunlight. If the morning sun hits the receiving eye, the door will refuse to close for no reason you can see. Move the sensor, or shade it. Do not disable it.
Step ten: Program the remotes and change the keypad PIN. Pair remotes per the manual. If the kit includes a wireless keypad, change the factory PIN the day you install it. Every keypad ships from the factory with the same default code, and the internet knows it.
Step eleven: Test the emergency release. With the door down, pull the release and make sure it re-engages cleanly when you run the opener. A release that sticks is a safety problem, not an inconvenience.
What I left off, and why
I did not put a belt drive unit on this list. Belt drive is quieter and it lasts as long, and if you have a bedroom above the garage the thirty dollar gap is worth every penny. But this is a chain drive guide, and the best belt pick belongs in its own piece.
I also left off commercial duty openers. A commercial door runs a completely different duty cycle, and a residential unit will not survive it no matter what the box says. Different job, different hardware.
And I did not include any openers with plastic gears dressed up as heavy duty. That label is marketing. If the gear material is not stated plainly, assume the worst.
What this all costs
The two units above sit in the range I trust for a residential door, and you can check current Amazon price on both. What people forget is the rest of the bill.
If you hire the install out, the labor around here runs $150 to $250, and I charge in that range myself. The DIY install is doable, and I will keep telling handy people to do it, but be honest with yourself about the ladder time and the header bracket. The wrong header bracket is a slow-motion gear failure, and it takes a year to show up.
Battery backup is worth thinking about in tornado country, since the garage is often the emergency exit when the power is out. Do not assume it is included. Read the feature list on the listing before you order, because that is a spec that changes between kits in the same family.
The tools are things you probably own: a drill, a socket set, a level, a tape measure, and a ladder tall enough for your ceiling. Add a second person for the hang. That is the whole shopping list.
Do the balance check, put the header bracket dead center, set the force to the minimum that moves the door, and either of these openers will outlast the door it is bolted to. Skip the balance check and you will be buying the third one in eight years.